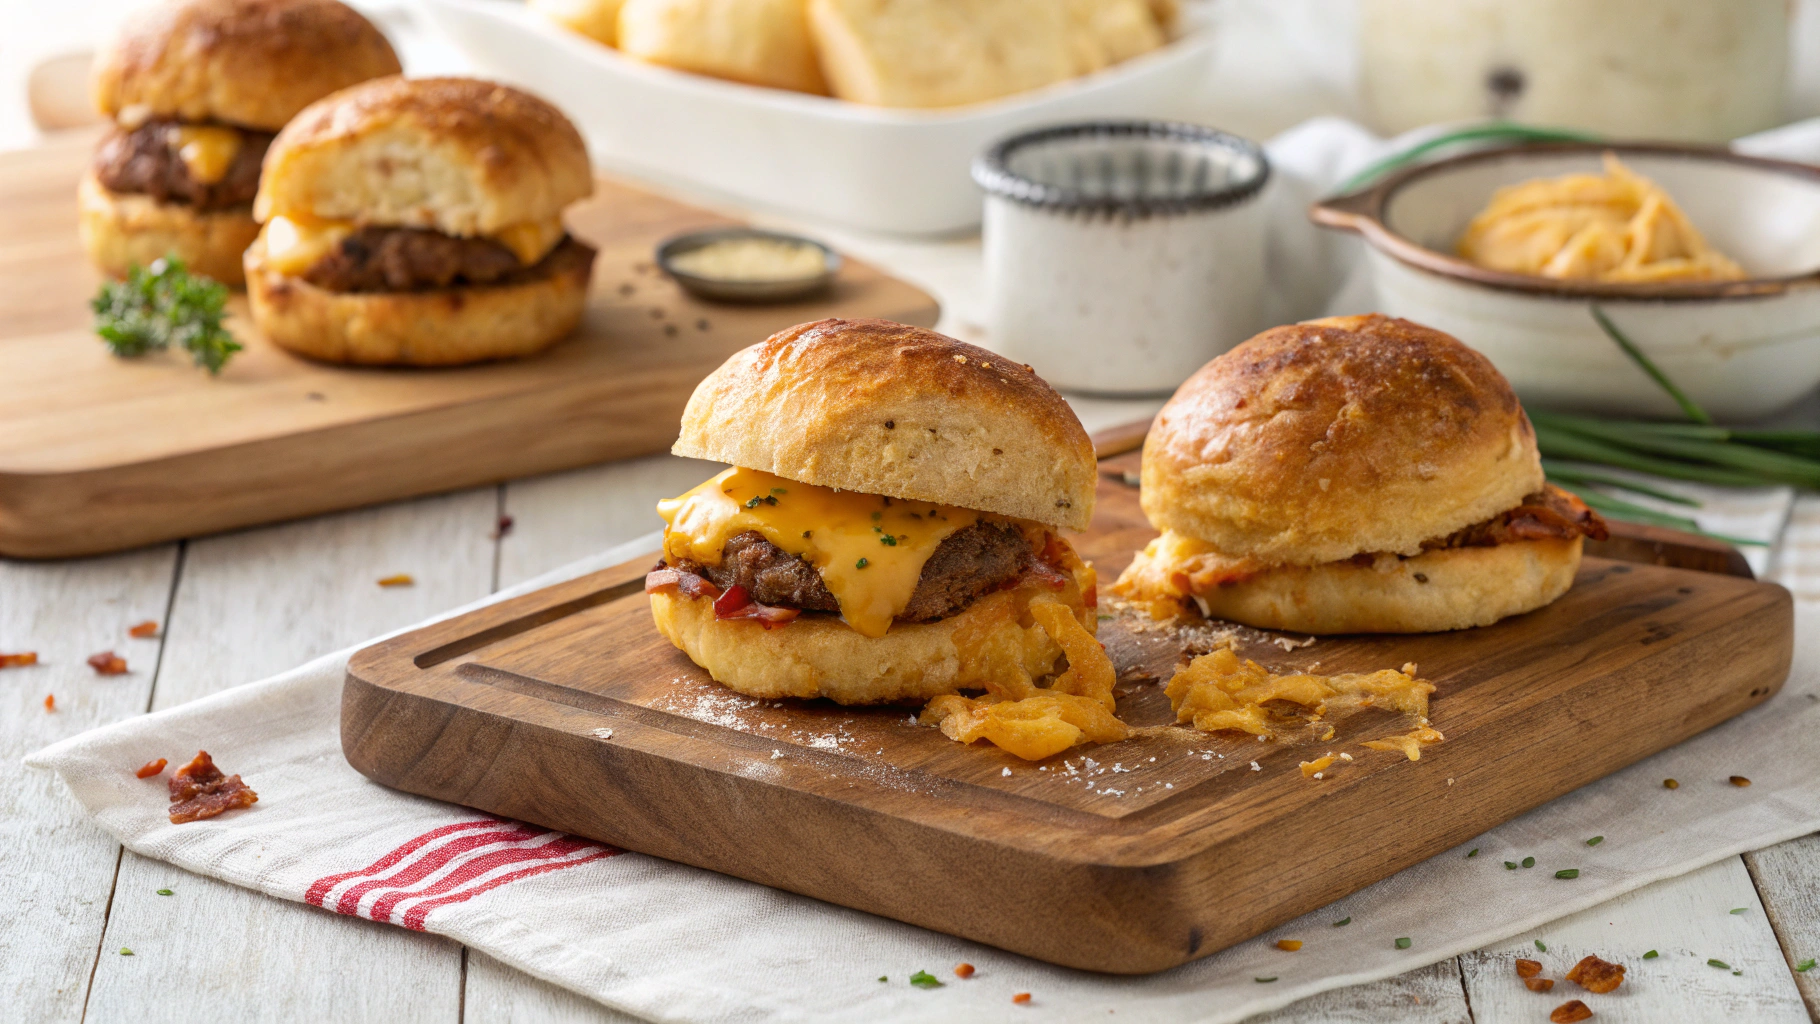
Cheese Puff Sliders
Introduction
If you’re looking for a delightful twist on classic mini burgers, these Cheese Puff Sliders are a must-try. Featuring light and airy cheese-infused buns, juicy beef patties, and a tangy secret sauce, these sliders are packed with flavor in every bite. Whether you’re hosting a party or simply craving a fun and delicious meal, these sliders are guaranteed to impress.
Why choose this Cheese Puff Sliders recipe?
These Cheese Puff Sliders offer a unique take on traditional sliders. The cheese puff buns add a light, airy texture that perfectly complements the savory beef patties. Additionally, the tangy secret sauce ties all the flavors together with a zesty kick, creating a perfect balance of taste and texture. Easy to prepare and sure to impress, these sliders are a delightful treat for any occasion.
Ingredients for Cheese Puff Sliders
- 1/2 cup water
- 2 tablespoons unsalted butter
- 1/4 teaspoon salt
- 1/2 cup all-purpose flour
- 2 large eggs
- 1/4 teaspoon cayenne pepper
- 1/4 teaspoon black pepper
- 1/2 cup shredded Gruyere cheese
- 1/2 cup shredded Cheddar cheese
- 1/4 cup mayonnaise
- 1 tablespoon ketchup
- 1 teaspoon mustard
- 1 pound ground beef
- 12 small pickles
- Salt and pepper to taste
- 12 small tomato slices
- 12 small lettuce leaves
Preparation Steps for Cheese Puff Sliders
Step 1: Prepare the Cheese Puff Buns
Start by preheating the oven to 450°F (235°C) and lining a baking sheet with a silicone mat. In a pot, simmer water, butter, and salt, then stir in flour to form a dough. Once the dough is ready, incorporate eggs, cayenne, black pepper, and half of the cheese. Scoop out 12 dough balls onto the baking sheet, sprinkle with the remaining cheese, and bake until golden brown.
Step 2: Make the Secret Sauce
In a bowl, combine mayonnaise, ketchup, and mustard to create the tangy secret sauce. Set it aside for later use.
Step 3: Cook the Sliders
Shape the ground beef into 12 small patties, season with salt and pepper, then cook them in a skillet over medium-high heat for 2-3 minutes per side for a perfect medium-rare finish. Allow the patties to rest for a few minutes.
Step 4: Assemble the Sliders
Slice the cheese puffs in half and spread a tablespoon of the secret sauce on each bottom half. Place a beef patty, pickle, tomato slice, and lettuce leaf on each bottom half, then cover with the remaining bun halves. Serve the sliders immediately for a delightful treat.
Health Benefits of Cheese Puff Sliders
While Cheese Puff Sliders may not be the most health-conscious meal due to their indulgent ingredients like cheese and beef, they can still offer some nutritional value. The protein from the beef patties can help keep you full and satisfied, while the lettuce, tomatoes, and pickles provide essential vitamins and minerals. Moderation is key when enjoying these delicious sliders as part of a balanced diet.
Origin and History of the Cheese Puff Sliders Recipe
The Cheese Puff Sliders recipe is a modern twist on the classic slider concept. The innovative use of cheese puff buns adds a unique and flavorful element to traditional sliders, making them a popular choice for parties, gatherings, or casual meals. While the exact origin of this specific recipe is unclear, sliders have been a beloved snack or appetizer for decades, and this creative variation continues to delight food enthusiasts.
Delicious Variations Around Cheese Puff Sliders
For those looking to add a personal touch to their Cheese Puff Sliders, there are several delicious variations to explore. Consider swapping the beef patties for ground turkey or chicken for a lighter option. Experiment with different cheeses in the buns, such as mozzarella or parmesan, to create unique flavor profiles. For a spicy kick, try incorporating sliced jalapeños or hot sauce into the secret sauce for an extra zesty twist.
Chef’s Tips for Perfecting Your Cheese Puff Sliders
To elevate your Cheese Puff Sliders to perfection, here are some tips from culinary experts:
- Ensure the cheese puff buns are fully cooled before assembling the sliders to maintain their texture.
- Season the beef patties generously with salt and pepper for enhanced flavor.
- Experiment with different types of cheeses and toppings to create a personalized slider experience.
- For a crispy finish, briefly broil the assembled sliders to toast the buns and melt the cheese.
Ingredient Alternatives for Cheese Puff Sliders
While the traditional Cheese Puff Sliders recipe is delicious as is, there are some ingredient alternatives you can consider to customize the sliders to your liking:
- For the Cheese Puff Buns:
- Experiment with different cheese varieties like mozzarella, gouda, or Monterey Jack for a unique flavor twist.
- Try adding herbs or spices to the dough for added complexity.
- For the Sliders:
- Substitute the beef patties with ground turkey or chicken for a lighter option.
- For a vegetarian version, swap the beef patties with veggie patties or a grilled portobello mushroom cap.
Tips and Tricks to Perfect Your Cheese Puff Sliders
Creating the perfect Cheese Puff Sliders requires attention to detail and a few insider tips:
- Ensure the cheese puff buns are fully cooled before slicing and assembling the sliders to prevent them from becoming soggy.
- Season your beef patties generously with salt and pepper before cooking to enhance their flavor.
- Don’t overcrowd the skillet when cooking the sliders to ensure they sear properly and develop a delicious crust.
- Customize the secret sauce by adjusting the ratios of mayonnaise, ketchup, and mustard to suit your taste preferences.
Side Dish Suggestions for Cheese Puff Sliders
Pairing your Cheese Puff Sliders with the right side dishes can elevate your meal experience. Here are some side dish suggestions that complement the sliders perfectly:
- Crispy Garlic Parmesan Fries
- Refreshing Cucumber Tomato Salad
- Creamy Coleslaw with a Tangy Dressing
- Homemade Sweet Potato Chips
FAQ about the recipe Cheese Puff Sliders
How to store the recipe Cheese Puff Sliders after cooking?
After cooking, it’s best to store the Cheese Puff Sliders in an airtight container in the refrigerator. They can be kept for up to 2 days. To reheat, simply place them in the oven at 350°F (175°C) for about 5-10 minutes until they are warmed through.
Can the recipe Cheese Puff Sliders be prepared in advance?
Absolutely! You can prepare the Cheese Puff Sliders in advance. You can make the cheese puff buns ahead of time and store them in an airtight container for up to 2 days or freeze them for longer storage. Just remember to reheat them before assembling the sliders for the best taste and texture.
What ingredients can be substituted in the recipe Cheese Puff Sliders?
While the recipe calls for Gruyere and Cheddar cheese, you can experiment with other cheese varieties like mozzarella, gouda, or Monterey Jack to create your unique flavor combination. Feel free to get creative with the cheese choices to suit your taste preferences.
How to adapt the recipe Cheese Puff Sliders for a vegetarian version?
To make a vegetarian version of the Cheese Puff Sliders, you can swap the beef patties with veggie patties or a portobello mushroom cap. Follow the same assembly process with the toppings, and you’ll have a delicious vegetarian option that everyone can enjoy.
Is the recipe Cheese Puff Sliders suitable for children?
Yes, the Cheese Puff Sliders are a great option for children. The fun size and tasty combination of flavors make them appealing to kids. You can also customize the sliders with kid-friendly toppings to suit their preferences, making it a hit with the little ones.
Conclusion about the recipe Cheese Puff Sliders
These Cheese Puff Sliders are a fun and delicious take on the classic mini burger, with fluffy cheese-infused buns, juicy beef patties, and a tangy secret sauce. Whether you’re making them for a party or just a family dinner, they’re sure to be a hit. The best part is that they’re customizable, so you can make them just the way you like. Give them a try – I promise you’ll love every cheesy, flavorful bite.
📌 Keep This Recipe Handy & Discover More Tasty Ideas!
Enjoyed this recipe? Don’t let it slip away! Save it now on Pinterest so it’s always just a click away. Pinning it also helps others find simple, delicious meal ideas!
💡 Whether you’re organizing your weekly meal plan or whipping up something special for guests, having your go-to recipes saved makes life in the kitchen so much easier. Use Pinterest to collect your favorites, explore new versions of classic dishes, and revisit your top meals anytime.
📲 Don’t forget to follow us on Pinterest for a daily dose of inspiration — from cozy family dinners and quick lunches to seasonal desserts and healthy snacks. We update regularly with recipes designed to fit your lifestyle and taste.
📖 Craving more? Head over to our full recipe library to browse a wide variety of easy and flavorful dishes. No matter your skill level, you’ll find recipes that are simple to make and packed with flavor.
✨ Bookmark your favorites and swing by often — there’s always something fresh and delicious waiting for you!