Cherry Pie Bars
Introduction
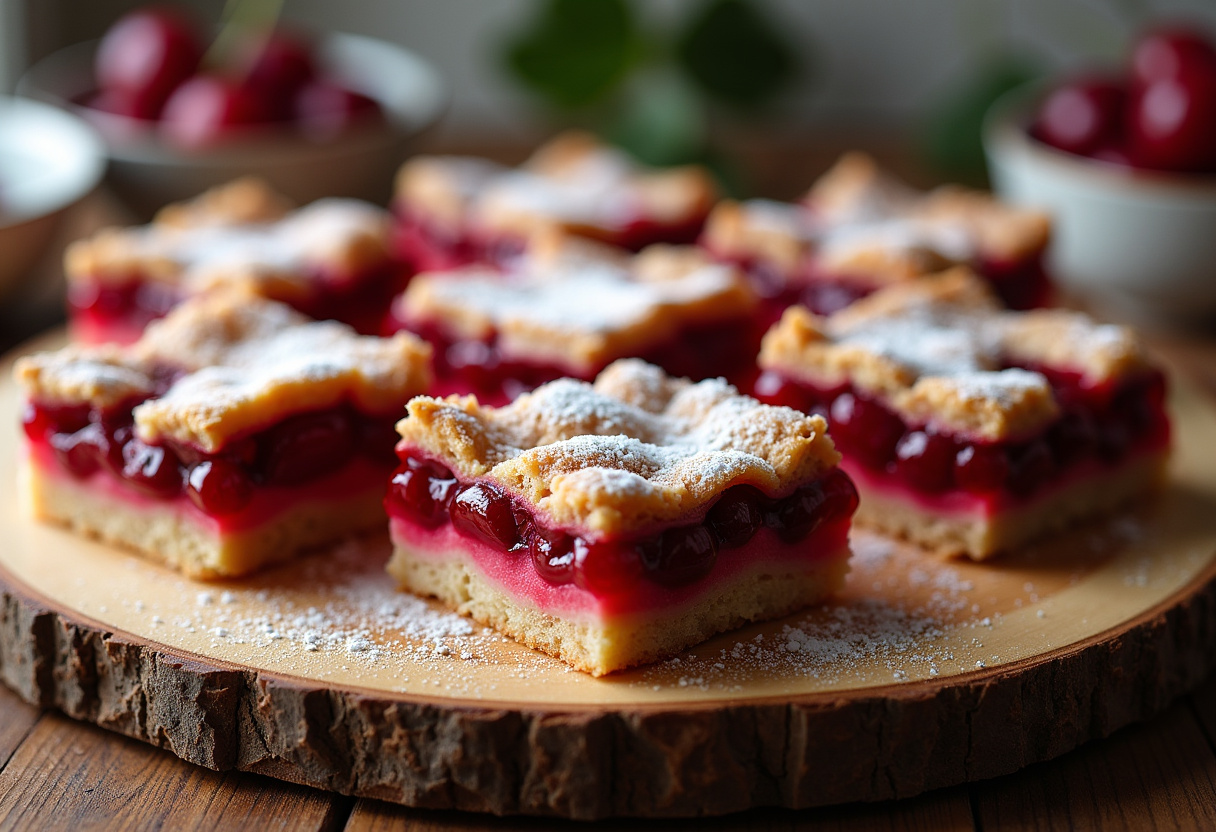
Indulge in the mouthwatering goodness of Cherry Pie Bars, a perfect dessert that combines a buttery crust with a sweet, tart cherry filling. These bars are easy to make and are sure to become a favorite at any gathering. Follow this SEO-friendly recipe to create a treat that’s both delicious and visually appealing.
Why choose this Cherry Pie Bars recipe?
Cherry Pie Bars are a delightful dessert that offers a perfect balance between the buttery crust and the sweet-tart cherry filling. This recipe provides a step-by-step guide that ensures you achieve a delicious outcome every time. Whether you’re a beginner or an experienced baker, these bars are a crowd-pleaser that will impress your guests.
Ingredients for Cherry Pie Bars
- 1 cup unsalted butter, melted
- 1 cup granulated sugar
- 1/2 cup packed brown sugar
- 1 teaspoon vanilla extract
- 3 cups all-purpose flour
- 1/2 teaspoon salt
- 4 cups fresh or frozen cherries, pitted
- 1 cup granulated sugar
- 2 tablespoons cornstarch
- 1 tablespoon lemon juice
- 1 teaspoon almond extract
- 1 cup powdered sugar
- 2-3 tablespoons milk
- 1/2 teaspoon vanilla extract
Preparation Steps for Cherry Pie Bars
Step 1: Preheat the Oven
Begin by preheating your oven to 350°F (177°C). Line a 9×13-inch baking pan with parchment paper, ensuring some overhang for easy removal of the bars after baking.
Step 2: Make the Crust and Topping
In a large bowl, mix the melted butter, granulated sugar, brown sugar, and vanilla extract. Add the flour and salt, combining until a thick dough forms. Reserve 1 cup of the dough for the topping, then press the rest into the prepared pan to form the crust.
Step 3: Prepare the Cherry Filling
In a separate bowl, combine the pitted cherries, granulated sugar, cornstarch, lemon juice, and almond extract. Ensure the cherries are evenly coated with the mixture.
Step 4: Assemble the Bars
Spread the prepared cherry filling evenly over the crust in the baking pan. Crumble the reserved dough on top of the cherry layer.
Step 5: Bake the Bars
Bake the assembled bars for 45-55 minutes, or until the top is lightly golden and the cherry filling is bubbling. If the top browns too quickly, cover with foil while baking.
Health Benefits of Cherry Pie Bars
Cherry pie bars not only satisfy your sweet cravings but also offer some health benefits. Cherries are packed with antioxidants and anti-inflammatory compounds that may help reduce inflammation, lower cholesterol levels, and improve heart health. Additionally, cherries are rich in vitamins and minerals, such as vitamin C and potassium, which support overall wellness.
Origin and History of the Cherry Pie Bars Recipe
The origins of cherry pie bars can be traced back to traditional cherry pie recipes. Over time, the concept evolved into a more convenient and portable form, giving rise to cherry pie bars. This adaptation allows for easier serving and sharing, making it a popular choice for gatherings and events.
Delicious Variations Around Cherry Pie Bars
While the classic cherry pie bars recipe is a favorite, there are endless possibilities for creative variations. Consider experimenting with different fruit fillings, such as blueberries, peaches, or apples, to add a twist to the traditional recipe. You can also customize the crust by incorporating nuts or oats for added texture and flavor.
Chef’s Tips for Perfecting Your Cherry Pie Bars
For the perfect cherry pie bars, pay attention to the following tips:
- Ensure the crust is evenly pressed into the pan to create a sturdy base for the bars.
- Use fresh cherries when available for the best flavor, but frozen cherries can also be used.
- Allow the bars to cool completely before cutting to ensure clean slices.
- Adjust the sweetness of the filling to suit your taste preferences.
- Experiment with different glazes or toppings, such as a lemon glaze or a crumb topping, for added variety.
Mistakes to Avoid When Preparing Cherry Pie Bars
When making Cherry Pie Bars, there are some common mistakes that can affect the final result. Avoid these pitfalls to ensure your bars turn out perfectly:
- Overbaking: Be cautious not to overbake the bars, as this can result in a dry crust and tough filling. Follow the recommended baking time and check for doneness with a toothpick.
- Uneven Crust Thickness: Ensure the crust is evenly pressed into the pan to prevent uneven baking. An even crust helps maintain the structural integrity of the bars.
- Using Wet Cherry Filling: Excess moisture in the cherry filling can make the bars soggy. Thoroughly drain any excess liquid from the cherries before spreading them over the crust.
- Skipping the Cooling Step: Allowing the bars to cool completely before adding the glaze and cutting is crucial. This helps set the filling and ensures clean cuts when serving.
Ingredient Alternatives for Cherry Pie Bars
While the traditional Cherry Pie Bars recipe is delightful, you can customize it by exploring different ingredient variations. Consider these alternatives to add a unique twist to your bars:
- Crust Variation: Experiment with using graham cracker crumbs or crushed nuts in the crust for added flavor and texture.
- Fruit Substitution: Swap out cherries for other fruits like peaches, apples, or mixed berries to create diverse flavor profiles.
- Glaze Options: Instead of a vanilla glaze, try a citrus glaze using lemon or orange zest for a refreshing twist.
- Nutritional Modifications: For a healthier option, substitute part of the all-purpose flour with whole wheat flour or incorporate oats into the crust for extra fiber.
Tips and Tricks to Perfect Your Cherry Pie Bars
Enhance your Cherry Pie Bars preparation with these helpful tips to elevate the flavor and presentation of your dessert:
- Chill the Bars: For easier slicing and cleaner cuts, refrigerate the bars for an hour after glazing before serving.
- Enhanced Flavor: Add a touch of cinnamon or nutmeg to the cherry filling for a warm, aromatic note that complements the fruit.
- Creative Decorations: Top your bars with toasted almond slices, chopped pistachios, or shredded coconut for a decorative and crunchy finish.
- Cut Into Shapes: Use cookie cutters to cut the bars into fun shapes for special occasions or to add a decorative element to your dessert spread.
Side Dish Suggestions for Cherry Pie Bars
Pair your delectable Cherry Pie Bars with complementary side dishes to create a well-rounded dessert experience. Consider these accompaniments to delight your taste buds:
- Vanilla Bean Ice Cream: Serve a scoop of rich and creamy vanilla bean ice cream alongside the bars for a classic combination of warm and cold textures.
- Whipped Cream and Berries: Dollop freshly whipped cream on top of the bars and garnish with a medley of fresh berries for a light and fruity contrast.
- Hot Beverage Pairing: Enjoy your Cherry Pie Bars with a steaming cup of coffee, a comforting chai latte, or a fragrant herbal tea to create a cozy dessert moment.
- Caramel Drizzle: Drizzle warm caramel sauce over the bars just before serving to add a decadent sweetness that enhances the cherry filling.
FAQ about the recipe Cherry Pie Bars
How to store the recipe Cherry Pie Bars after cooking?
To store Cherry Pie Bars after baking, let them cool completely in the pan on a wire rack. Once cooled, transfer them to an airtight container and keep them at room temperature. They will stay fresh and delicious for up to 3 days. Avoid exposure to direct sunlight or heat sources to maintain their quality.
Can the recipe Cherry Pie Bars be prepared in advance?
Absolutely! You can prepare Cherry Pie Bars ahead of time to save time and enjoy convenience. Make the bars a day or two in advance and store them in an airtight container. You can keep them at room temperature or in the refrigerator. For longer storage, freeze the bars and thaw them before serving for a delightful treat.
What ingredients can be substituted in the recipe Cherry Pie Bars?
If you need to substitute ingredients in the Cherry Pie Bars recipe, you can replace fresh or frozen cherries with canned cherry pie filling. Adjust the added sugar quantity as canned filling may vary in sweetness. Additionally, you can customize the recipe by swapping cherries with other fruits like blueberries or raspberries for a unique twist.
How to adapt the recipe Cherry Pie Bars for a vegetarian version?
To adapt Cherry Pie Bars for a vegetarian version, ensure that all ingredients used are plant-based and free of any animal-derived products. Substitute butter with a vegan butter alternative and use plant-based milk in the glaze. Confirm that the powdered sugar is also vegetarian-friendly. Enjoy these delicious bars as a vegetarian-friendly dessert option.
Is the recipe Cherry Pie Bars suitable for children?
Cherry Pie Bars can be a delightful treat for children, but it’s essential to consider any potential allergies or dietary restrictions they may have. Ensure that the ingredients used are safe for children and adjust the sugar levels if needed. These bars can be a fun and tasty dessert for kids to enjoy with adult supervision.
Conclusion about the recipe Cherry Pie Bars
Cherry Pie Bars offer a perfect blend of flavors with a buttery crust, sweet cherry filling, and a luscious glaze. Whether served at gatherings or enjoyed as a special treat, these bars are versatile and sure to impress. Embrace the joy of baking and treat yourself to these delightful Cherry Pie Bars today!
📌 Save This Recipe and Explore More Culinary Delights!
Love this recipe? Don’t lose it! Pin it now on Pinterest to keep it within reach whenever you need a quick and delicious idea. Sharing it with your followers also helps spread the love for easy and flavorful home cooking!
💡 Whether you’re planning your next weeknight dinner or preparing a special meal for guests, having your favorite recipes saved makes cooking easier and more enjoyable. Pinterest is a great way to organize your meal ideas, try new twists on classics, and come back to those dishes you can’t get enough of.
📲 While you’re there, be sure to follow our Pinterest page to get inspired by our latest creations — from comforting one-pot meals to healthy quick-fix ideas, seasonal treats, and much more. We regularly share new recipes that are simple, delicious, and perfect for everyday cooking.
📖 Ready for more inspiration? Visit our complete recipe archive on our dedicated recipe page. You’ll find dozens of easy-to-follow recipes designed to save you time in the kitchen while bringing great flavors to your table. Whether you’re a beginner or a seasoned cook, there’s something for everyone to explore!
✨ Don’t forget to bookmark your favorites and come back often — we’re always cooking up something new and exciting!
