Follow Me On Social Media!
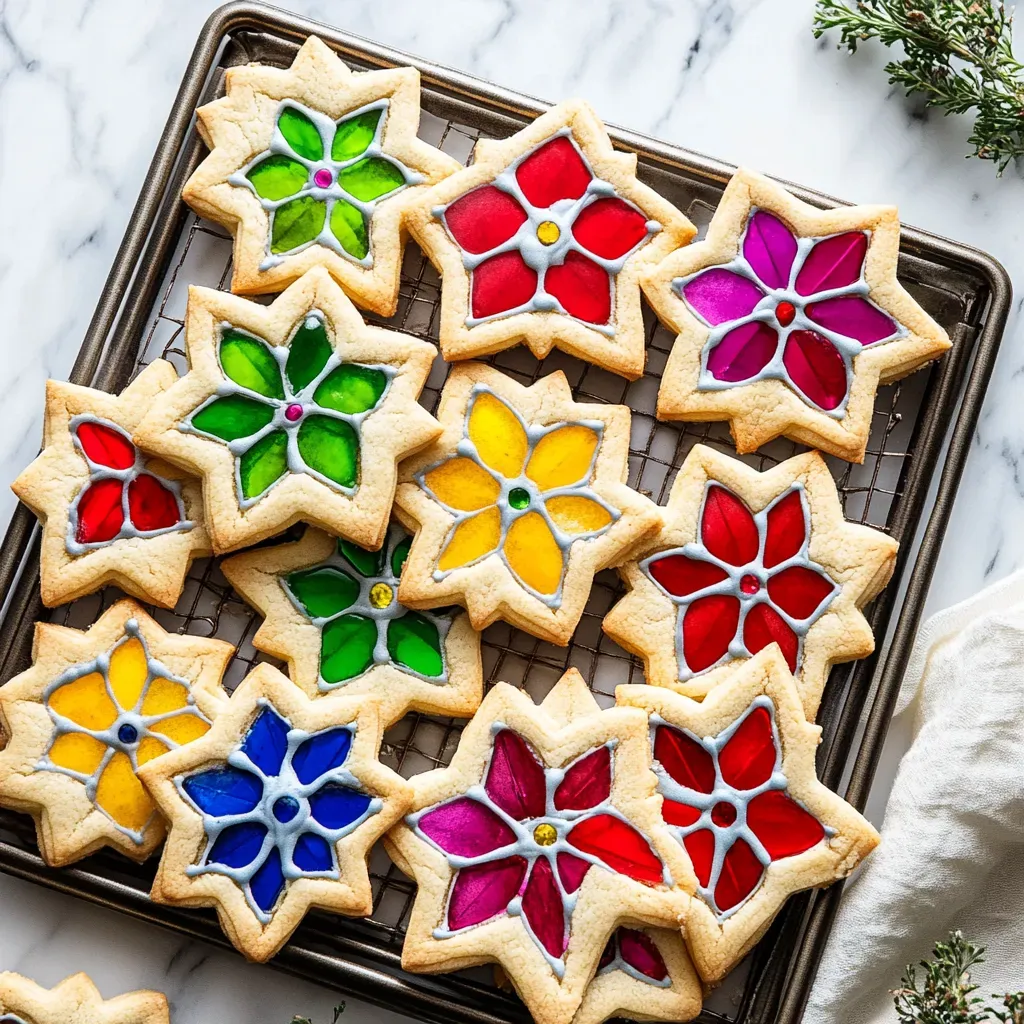
Step into a world of culinary enchantment with these delightful Glass Window Cookies! Like little works of art you can eat, these magical treats feature sparkling candy centers encased in buttery cookie borders, creating a mesmerizing stained glass effect. Whether you’re looking to add a touch of wonder to your holiday cookie plate or create special moments for loved ones, these cookies are sure to impress.
The secret behind these delectable treats lies in their natural blue color and juicy berry taste. By using frozen berries and a few simple ingredients, you can achieve vibrant purple-blue swirls that are as eye-catching as they are delicious. Perfect for both seasoned bakers and beginners, these cookies offer a fun and creative way to explore the world of plant-based baking while indulging in a sweet treat that’s both visually stunning and tasty.
So, roll up your sleeves, gather your ingredients, and embark on a baking adventure that will leave you and your loved ones in awe. Whether you’re hanging these cookies on your Christmas tree, gifting them to friends and family, or simply enjoying them with a cup of tea, these Glass Window Cookies are sure to bring joy and magic to your kitchen.
Quick Benefits
- Natural Ingredients: Made with berries for color and flavor, vegan butter, and other plant-based options.
- Eye-Catching Appearance: Cookies have a beautiful blue color and candy centers that sparkle like gems, making them perfect for special occasions.
- Educational Baking: Teaches about natural food colors, chemical reactions in baking, and the importance of precise measurements.
- Customizable and Fun: Offers variations for different seasons and occasions, allowing for creativity and personalization in baking.
Why You’ll Love This Decadent Stained Glass Window Cookies Recipe Recipe
- Unique and Beautiful Presentation: These cookies have a stunning stained glass appearance with vibrant blue color from natural berries, making them a visual masterpiece on any dessert table.
- Delicious Fusion: Combining the flavors of a blueberry muffin with a classic cookie, these treats offer a delightful mix of sweetness and fruitiness that is sure to please any palate.
- Vegan and Natural Ingredients: Perfect for those avoiding artificial colors, these cookies showcase how plant-based baking can be both visually stunning and scrumptious, making them a guilt-free indulgence.
- Versatile and Creative: With various seasonal variations suggested, from lemon in summer to candy canes in winter, these cookies offer endless opportunities for customization and experimentation in the kitchen.
- Educational and Engaging: Ideal for baking with kids, these cookies provide a fun and interactive way to teach about natural food colors, the science of baking, and the importance of precise measurements.
- Conversation Starter: These cookies are not just a treat; they are a talking point, sparking discussions about the magic of natural ingredients, the art of baking, and the joy of sharing homemade goodies with loved ones.
- Storage and Gifting Tips: From tips on preserving their unique appearance to creative packaging ideas for gifting, this recipe ensures that your cookies stay fresh, beautiful, and ready to spread joy to others.
Ingredients for Decadent Stained Glass Window Cookies Recipe
Cookie Base
- Just over 2 cups (281g) regular flour, and a little more for dusting
- 3/4 cup (150g) white sugar
- 3/4 cup (170g) butter, softened at room temperature
- 2 teaspoons vanilla (pure); 1 egg, not cold
- Half a teaspoon baking powder
- Quarter teaspoon of table salt
Window Center
- Unwrap 15 to 20 hard candies (like Life Savers or Jolly Ranchers)
Optional Topping
- 2 spoons of water or 1 egg white, for coating
- One-third cup (65g) colored sugar or fun sprinkles
Pro Tips for Decadent Stained Glass Window Cookies Recipe
Pro Tip 1: To achieve the vibrant blue color in these blueberry cookies, ensure your berries are frozen and do not thaw them before using. This helps retain the color during baking. Additionally, cooling the dough fully before baking and allowing the cookies to cool completely on wire racks will help maintain the beautiful color and texture of the cookies.
Pro Tip 2: Experiment with seasonal variations to add excitement to these cookies. For example, in the summer, add fresh lemon peel, while in the fall, incorporate warm spices. Consider mixing in broken candy canes for a winter twist or tossing in lavender flowers for a springtime flavor. These variations can enhance the taste and visual appeal of the cookies throughout the year.
How to Make Decadent Stained Glass Window Cookies Recipe
Step 1: Dry Mix Ready
Combine salt, flour, and baking powder in a mixing bowl and set aside.
Step 2: Form Dough
Beat softened butter and sugar until fluffy, then mix in egg and vanilla. Gradually add dry ingredients. If too sticky, add an extra spoon of flour.
Step 3: Chill the Dough
Divide the dough into two portions, flatten each to 1/4 inch on parchment paper, and refrigerate for about an hour.
Step 4: Candy Prep
Separate the candy by colors and crush into small pieces using a rolling pin. Keep nearby for later use.
Step 5: Shape and Fill
Cut out the main cookies using large cutters, then use smaller cutters to carve out the centers. Fill the holes with crushed candy, filling them about three-quarters full.
Step 6: Bake and Cool Down
Bake at 350°F for 12-13 minutes until candy melts and cookies turn lightly golden. Allow to cool before handling.
📌 Pin for later!

Storage Tips
After baking the Glass Window Cookies, it’s important to store them properly to maintain their flavor and appearance. Place the cookies in sealed containers with parchment paper between layers to prevent sticking and maintain freshness. Store the cookies in a cool, dark place to preserve the vibrant blue color from the berries. If planning to freeze the cookies, store them in airtight containers or freezer bags, separating individual cookies for easy thawing and serving later on.
To keep the Glass Window Cookies looking extra special, consider displaying them on blue or white plates to make the colors pop. You can also enhance their appearance by dusting them with edible sparkles or turning them into sandwich cookies with a vanilla filling. If gifting the cookies, stacking them in glass jars can make for a beautiful presentation. By following these storage tips, you can ensure that your Glass Window Cookies continue to delight both visually and in taste.
Ingredient Substitutions
If you need to make these Glass Window Cookies vegan, you can easily swap the egg with a plant-based egg substitute like a flax egg or commercial egg replacer. Vegan butter can be used in place of regular butter, ensuring the cookies maintain their buttery flavor while keeping the recipe dairy-free. Look for vegan white chocolate chips to add an extra touch of sweetness to the cookies without compromising the vegan aspect of the recipe. Additionally, plant-based milk can be used to adjust the dough’s consistency as needed.
For those looking to experiment with different flavor variations, consider swapping the hard candies with natural alternatives like dried fruit pieces or chopped nuts for a unique twist on the classic recipe. Instead of using colored sugar or fun sprinkles for coating, you could try crushed freeze-dried berries or nuts for added texture and flavor. Playing around with various extracts such as almond or lemon can introduce new dimensions to the cookies’ taste profile while keeping them colorful and visually appealing.
Serving Suggestions
Serve these delightful Glass Window Cookies on a blue or white plate to make the vibrant purple-blue swirls pop. Dust them with edible sparkles for a touch of magic or turn them into cookie sandwiches with a sweet vanilla filling for an extra special treat. You can also stack them in glass jars and tie a ribbon around the top for a thoughtful homemade gift that showcases their stunning appearance.
To elevate these cookies even further, consider toasting the vegan butter for a richer flavor or adding blueberry powder to intensify the color. Experiment with swirled patterns in the dough or try using different sizes of chocolate chips to create unique variations. These cookies are not only delicious but also a fun way to learn about natural food colors and the science behind baking, making them a delightful treat for bakers of all skill levels.
FAQs for Decadent Stained Glass Window Cookies Recipe
Question?
How can I ensure my glass window cookies have a vibrant blue color?
Question?
What do I do if my cookie dough is too sticky?
Question?
How should I store my glass window cookies to maintain their taste and appearance?
Question?
What are some tips for making these glass window cookies extra special?
Conclusion
So there you have it – a delightful recipe for Glass Window Cookies that not only tastes amazing but also brings joy and wonder to your baking experience. These colorful treats are not just cookies; they are little edible works of art that will surely impress your friends and family.
Whether you’re a seasoned baker looking to try something new or a beginner eager to embark on a fun baking adventure, these Glass Window Cookies are sure to delight and inspire. Embrace the magic of natural ingredients and enjoy the process of creating these beautiful and delicious treats. Happy baking and savor every colorful bite of these enchanting cookies!
📌 Pin for later!
Decadent Stained Glass Window Cookies Recipe
“Magical stained glass window cookies turn ordinary ingredients into edible works of art, perfect for holiday gifting and adding wonder to any cookie plate.”
Prep Time150 Minutes
Cook Time13 Minutes
Total Time163 Minutes
CuisineAmerican
Skill LevelEasy
Servings24 Servings (24 cookies)
Ingredients
Cookie Base
- Just over 2 cups (281g) regular flour, and a little more for dusting
- 3/4 cup (150g) white sugar
- 3/4 cup (170g) butter, softened at room temperature
- 2 teaspoons vanilla (pure); 1 egg, not cold
- Half a teaspoon baking powder
- Quarter teaspoon of table salt
Window Center
- Unwrap 15 to 20 hard candies (like Life Savers or Jolly Ranchers)
Optional Topping
- 2 spoons of water or 1 egg white, for coating
- One-third cup (65g) colored sugar or fun sprinkles
Instructions
-
Dry Mix Ready: Combine salt, flour, and baking powder in a mixing bowl and set aside.
-
Form Dough: Beat softened butter and sugar until fluffy, then mix in egg and vanilla. Gradually add dry ingredients. If too sticky, add an extra spoon of flour.
-
Chill the Dough: Divide the dough into two portions, flatten each to 1/4 inch on parchment paper, and refrigerate for about an hour.
-
Candy Prep: Separate the candy by colors and crush into small pieces using a rolling pin. Keep nearby for later use.
-
Shape and Fill: Cut out the main cookies using large cutters, then use smaller cutters to carve out the centers. Fill the holes with crushed candy, filling them about three-quarters full.
-
Bake and Cool Down: Bake at 350°F for 12-13 minutes until candy melts and cookies turn lightly golden. Allow to cool before handling.