Follow Me On Social Media!
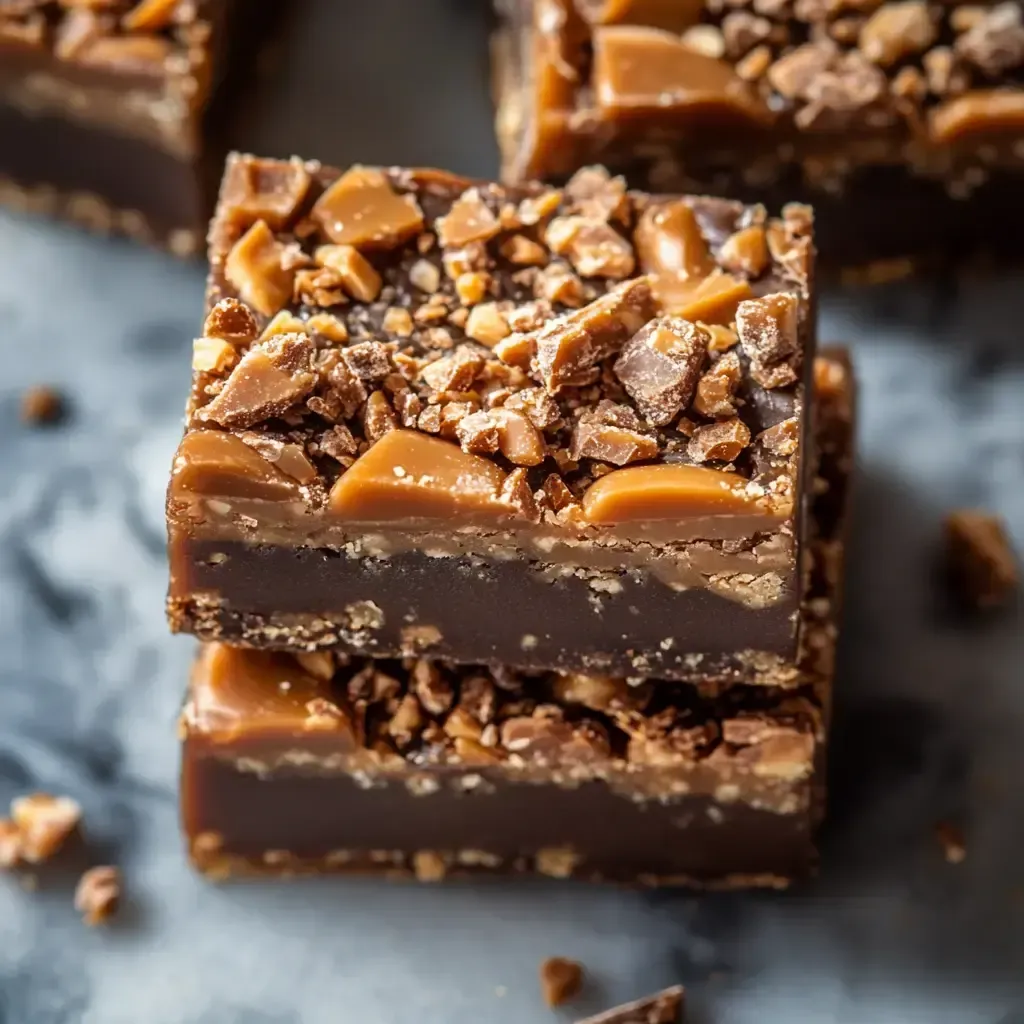
If you’re on the hunt for a show-stopping dessert that will have everyone asking for the recipe, look no further than these indulgent Butterfinger Bars. Picture this: a buttery graham cracker base, gooey caramel, and crunchy Butterfinger candy pieces all topped with a luscious layer of chocolate. These bars are a flavor explosion that will have your taste buds doing a happy dance with every bite.
I stumbled upon the magic of these Butterfinger Bars during a bake sale frenzy in my community, and they’ve been a hit ever since. The combination of textures and flavors in these bars is pure dessert perfection. From the sweet crunch of the Butterfinger candy to the velvety smoothness of the chocolate, every bite is a delicious adventure. Trust me, once you try these bars, you’ll understand why they’re always in such high demand.
Elevate your dessert game with these Butterfinger Bars that are sure to steal the show at any gathering. Whether you’re a seasoned baker or just starting out, these bars are a breeze to make and a joy to share. So, roll up your sleeves, gather your ingredients, and get ready to whip up a batch of these irresistible treats that will have everyone coming back for more.
Quick Benefits
- Irresistible Flavor Combination: The mix of graham cracker base, sticky caramel, crunchy Butterfinger chunks, and velvety chocolate creates a delightful and indulgent treat.
- Versatile for Any Occasion: Perfect for bake sales, school fundraisers, team celebrations, or just a sweet treat at home, these bars are a versatile option for any gathering.
- Convenient and Travel-Friendly: They are easy to make ahead, travel well without falling apart, and actually taste better on day two after the flavors meld together.
- Customizable Twist: You can easily customize the recipe by swapping in different chocolates, adding a peanut butter swirl, or trying different candy chunks to make it your own signature treat.
Why You’ll Love This Homemade Butterfinger Bars Recipe Recipe
- Irresistible Flavor Combination – The mix of buttery graham cracker crumbs, sticky caramel, crunchy Butterfinger chunks, and velvety chocolate creates a sweet tooth paradise that is sure to satisfy all dessert cravings.
- Crowd-Pleasing Dessert – These bars are a guaranteed hit at any gathering or event, as evidenced by the frenzy they caused at a community bake sale and the coach requesting them for future team celebrations.
- Easy to Transport – Perfect for parties and potlucks, these bars travel well without falling apart, making them a convenient and impressive treat to bring to any occasion.
- Make Ahead and Freezer-Friendly – The bars taste even better on day two as the flavors meld together, and they can be stored in the fridge for up to a week. Additionally, they freeze well, offering a quick and delicious treat whenever needed.
- Customizable – The recipe allows for customization by swapping ingredients like milk chocolate, adding a peanut butter swirl, or using different candy chunks, giving you the freedom to create your own unique version of these delectable bars.
- Family-Friendly Fun – Involving your family in the baking process creates a memorable experience as you all work together to turn basic ingredients into something amazing, fostering joy and togetherness.
Ingredients for Homemade Butterfinger Bars Recipe
- Extra pieces of Butterfinger candy for topping.
- 1 cup of crushed Butterfinger candy pieces.
- 1 cup of caramel bits or soft caramel squares.
- 1½ cups of graham cracker crumbs.
- 2 tablespoons of heavy cream.
- 1½ cups of semi-sweet chocolate chips.
- 1 tablespoon of unsalted butter.
- ½ cup of melted unsalted butter.
- ¼ cup of white sugar.
Pro Tips for Homemade Butterfinger Bars Recipe
For perfect Butterfinger Bars every time, line your pan with parchment paper leaving extra hanging off the sides for easy removal. This ensures clean slices and makes it a breeze to lift the bars out of the pan. When cutting the bars, cool your knife between each slice to achieve neat and picture-perfect squares.
To enhance the flavor of these bars, consider making them a day ahead. The flavors meld together beautifully overnight, creating an even more delicious treat. Additionally, feel free to customize the recipe by experimenting with different chocolate types or adding in your favorite mix-ins like peanut butter swirls or Heath bar chunks. Embrace the fun of baking by finding your own unique twist to make these bars your own special creation.
How to Make Homemade Butterfinger Bars Recipe
Step 1: Prepare Crust
Combine graham crumbs, sugar, and melted butter. Press into an 8×8 pan lined with parchment paper and bake at 350°F for 8–10 minutes.
Step 2: Caramel Filling
Melt caramels with cream over low heat until smooth, then pour over the baked crust.
Step 3: Candy Topping
Sprinkle crushed Butterfinger candy over the caramel layer.
Step 4: Chocolate Coating
Melt the butter and chocolate chips together, then spread over the candy layer.
Step 5: Chill
Allow to cool on the counter for 30 minutes, then refrigerate for 2 hours.
📌 Pin for later!

Storage Tips
To store Butterfinger Bars, allow them to cool completely before cutting into squares for serving. Store the finished bars in an airtight container in the refrigerator for up to a week. The flavors of the graham cracker base, caramel, Butterfinger chunks, and chocolate topping will meld together beautifully over time, making them even more delicious on day two and beyond. If you would like to keep them for longer, you can freeze the bars in a freezer-safe container or resealable bag for up to a few months. Simply thaw them in the refrigerator before serving.
These dessert bars are perfect for taking to gatherings or events as they travel well without falling apart. When bringing them to a cookout or fundraiser, wrap the bars individually for easy serving and selling. Additionally, feel free to get creative with the recipe by experimenting with different variations such as using milk chocolate, adding a peanut butter swirl, or incorporating other candy bar chunks like Heath bars. The versatility of this recipe allows you to customize the bars to suit your taste preferences or to create a unique twist for any occasion.
Ingredient Substitutions
If you want to make a variation of these Butterfinger Bars, consider using different types of candy pieces. You could try swapping the Butterfinger candy for chopped Snickers, Reese’s Peanut Butter Cups, or even Heath bar to create a different flavor profile while still maintaining that sweet crunch. Additionally, if you prefer a less sweet option, you could use dark chocolate chips instead of semi-sweet for a richer taste.
For a dairy-free or vegan option, you can substitute the butter with a plant-based alternative like coconut oil or vegan butter. Similarly, you can use dairy-free chocolate chips and caramel bits to make the recipe suitable for those with dietary restrictions. To enhance the flavor, you could experiment with adding a pinch of sea salt to the caramel mixture or sprinkling some flaky sea salt on top of the bars before serving for a sweet and salty contrast. These simple substitutions can cater to various preferences and dietary needs while still resulting in a delicious and indulgent dessert.
Serving Suggestions
For a fun and delicious twist on serving these Butterfinger Bars, try crumbling some extra Butterfinger candy on top right before serving. This will add an extra pop of color and crunch to each bite, making them even more irresistible! Another creative idea is to drizzle some melted white chocolate on top of the bars for a beautiful contrast in color and an extra touch of sweetness. These simple additions will take your Butterfinger Bars to the next level and make them a show-stopping dessert at any gathering.
Want to impress your guests even more? Serve the Butterfinger Bars with a scoop of vanilla ice cream on the side. The combination of the warm, gooey bars and the cold, creamy ice cream creates a mouthwatering contrast in temperature and texture that will have everyone reaching for seconds. This dessert pairing is perfect for a dinner party or special celebration, and is sure to leave a lasting impression on all your guests!
FAQs for Homemade Butterfinger Bars Recipe
Can I use a different type of candy instead of Butterfinger for this recipe?
Absolutely! Feel free to experiment with different types of candy bars to create your own unique twist on these bars. You can try using Snickers, Reese’s, Heath bars, or any other favorite candy.
How long do I need to let the bars cool before cutting them?
It’s important to let the bars cool completely before cutting them to ensure clean slices. I recommend giving them at least 1-2 hours to cool at room temperature, or you can speed up the process by placing them in the refrigerator for about 30 minutes.
Can I make these bars ahead of time?
Absolutely! In fact, these bars actually taste even better on day two as the flavors have more time to blend together. You can make them a day in advance and store them in an airtight container in the refrigerator. They will stay fresh for about a week.
How should I store any leftovers of these Butterfinger Bars?
If you have any leftovers (which might be rare!), you can store them in an airtight container in the refrigerator. They will stay fresh for about a week. You can also freeze them for longer storage. Just make sure to wrap them well to prevent freezer burn.
Conclusion
So there you have it, the incredible journey of creating these irresistible Butterfinger Bars! They have become a staple in our family’s celebrations, bringing joy and smiles with every batch. The combination of buttery graham cracker crust, gooey caramel, crunchy Butterfinger pieces, and smooth chocolate coating is simply heavenly.
Whether you’re a seasoned baker or just starting out, these Butterfinger Bars are sure to impress and delight all who taste them. The beauty of this recipe lies in its versatility – feel free to experiment with different toppings or add-ins to make it your own unique creation. Remember, the secret ingredient is always love and a sprinkle of creativity!
So go ahead, whip up a batch of these delectable Butterfinger Bars and watch as they disappear in a heartbeat at your next gathering. The joy of creating something delicious and sharing it with others is truly priceless. Happy baking, and may your kitchen always be filled with the sweet aroma of homemade treats, especially these irresistible Butterfinger Bars!
📌 Pin for later!
Homemade Butterfinger Bars Recipe
“Indulge in the ultimate sweet treat with these Butterfinger Bars, a heavenly blend of graham cracker, caramel, crunchy candy pieces, and velvety chocolate!”
Prep Time30 Minutes
Cook Time10 Minutes
Total Time40 Minutes
CuisineAmerican
Skill LevelEasy
Servings16 Servings (16 bars)
Ingredients
- Extra pieces of Butterfinger candy for topping.
- 1 cup of crushed Butterfinger candy pieces.
- 1 cup of caramel bits or soft caramel squares.
- 1½ cups of graham cracker crumbs.
- 2 tablespoons of heavy cream.
- 1½ cups of semi-sweet chocolate chips.
- 1 tablespoon of unsalted butter.
- ½ cup of melted unsalted butter.
- ¼ cup of white sugar.
Instructions
-
Prepare Crust: Combine graham crumbs, sugar, and melted butter. Press into an 8×8 pan lined with parchment paper and bake at 350°F for 8–10 minutes.
-
Caramel Filling: Melt caramels with cream over low heat until smooth, then pour over the baked crust.
-
Candy Topping: Sprinkle crushed Butterfinger candy over the caramel layer.
-
Chocolate Coating: Melt the butter and chocolate chips together, then spread over the candy layer.
-
Chill: Allow to cool on the counter for 30 minutes, then refrigerate for 2 hours.